Accept the minion keys#
The final step in the installation process is for the Salt master to accept the Salt minion keys. Once the keys are accepted, the Salt master can issue commands to the minion and receive inbound messages from the minion. Salt minions do not receive data from the Salt master until the key is accepted.
Note
Before you can accept the minion keys, you must first install, configure, and start the Salt services. For more information, see:
About the Salt key exchange#
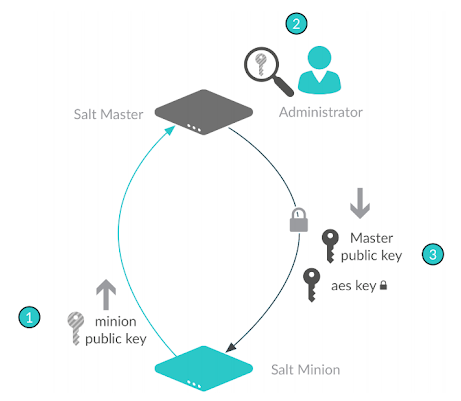
For security, Salt uses key-based authentication.
Two types of keys are used in Salt:
- RSA
- AES
The RSA keys are the backbone to the authentication and encryption model used by Salt. All Salt daemons run with unique RSA keys. The minions and master generate RSA keys when they start for the first time, and then use them for PKI-based authentication.
These keys are used to authenticate the AES key to the Salt master, providing secure communication by encrypting data. Each minion presents a public key to the Salt master. The key is then examined, compared, and explicitly accepted by an administrator.
The master also sends a rotating AES key that is used to encrypt and decrypt messages sent by the Salt master. The returned AES key is encrypted using the public key initially sent by the Salt minion, and can therefore be decrypted only by the same Salt minion.
The AES key is rotated in either of these conditions:
- Every 24 hours on the master
- When the master is restarted
- When a minion key deleted.
The key rotation allows the master to lock out minions that are not authenticated and it allows system-wide communication encryption.
Managing keys#
Most minion management is handled through a client called salt-key that runs
on the Salt master. This client is used for managing which minions are available
to a master.
You can use the salt-key command to interface with the authentication system
to accept, reject, and otherwise manage keys.
Accepting keys#
When a new minion checks in, the key will wait in Unaccepted keys until it
is accepted.
Call salt-key to see the current state of key management:
salt-key
Example response:
Unaccepted Keys:
db1
Accepted Keys:
web1
web2
Rejected:
badguy
In this example, to accept keys, run:
salt-key -a db1
If there are multiple keys to accept and are trusted, you can accept all at once:
salt-key -A
Danger
A master that is open to the internet is considered a security vulnerability.
Deleting keys#
Keys can also be deleted singularly or in bulk. Because this is a permanent action, running the command will give a [n/Y] prompt for confirmation.
Deleting a single key:
salt-key -d web1
Example response:
The following accepted key is set to be removed:
web1
[n/Y]
Deleting all keys:
salt-key -D
Example response:
The following keys are going to be deleted:
web1
web2
[n/Y]
Deleting keys using a filter:
salt-key -d 'web*'
Example response:
The following keys are going to be deleted:
web1
web2
[n/Y]
Automatically accept or reject keys#
It is possible to automate key acceptance. One approach would be to enable the
auto*accept: True setting in the master config file.
Danger
Automatically accepting keys is very dangerous. Auto accepting minions means anyone can set a minion to connect and gather data on the entire system or worse depending on master config settings.
Be extremely cautious about automatically accepting all incoming keys from a Salt minion. Just because it is possible to auto-accept keys does not mean you should do it.
For more information, see:
Reference: salt-key flags#
| Flag | Description |
|---|---|
-a <minion ID> |
Accepts a specific minion’s key. The -a flag needs to be followed by
an argument that includes the ID of the minion key that you want to
accept. |
-A |
Accepts all keys. |
-d <minion_id> |
Deletes a specific minion’s key. The -d flag needs to be followed by
an argument that includes the ID of the minion key that you want to
delete. |
-L |
Lists all minion IDs. |
Next steps#
After accepting the Salt minion keys, verify that your installation of Salt was successful. See Verify a Salt install for more information.